Friday

29th April 2011 - Cat and Frog cake

Tomorrow is the birthday of Ad's girlfriend, and he asked me to make a cake for her with frogs and black cats (one adult and one kitten).  Those where the only specifications given and rest was up to me.  I like it when the design is left to me because I can play around with things I haven't done before. 

The first new thing I tried was the carving of the cake into a small hill.  I needed to leave enough space for the frogs and pond. 

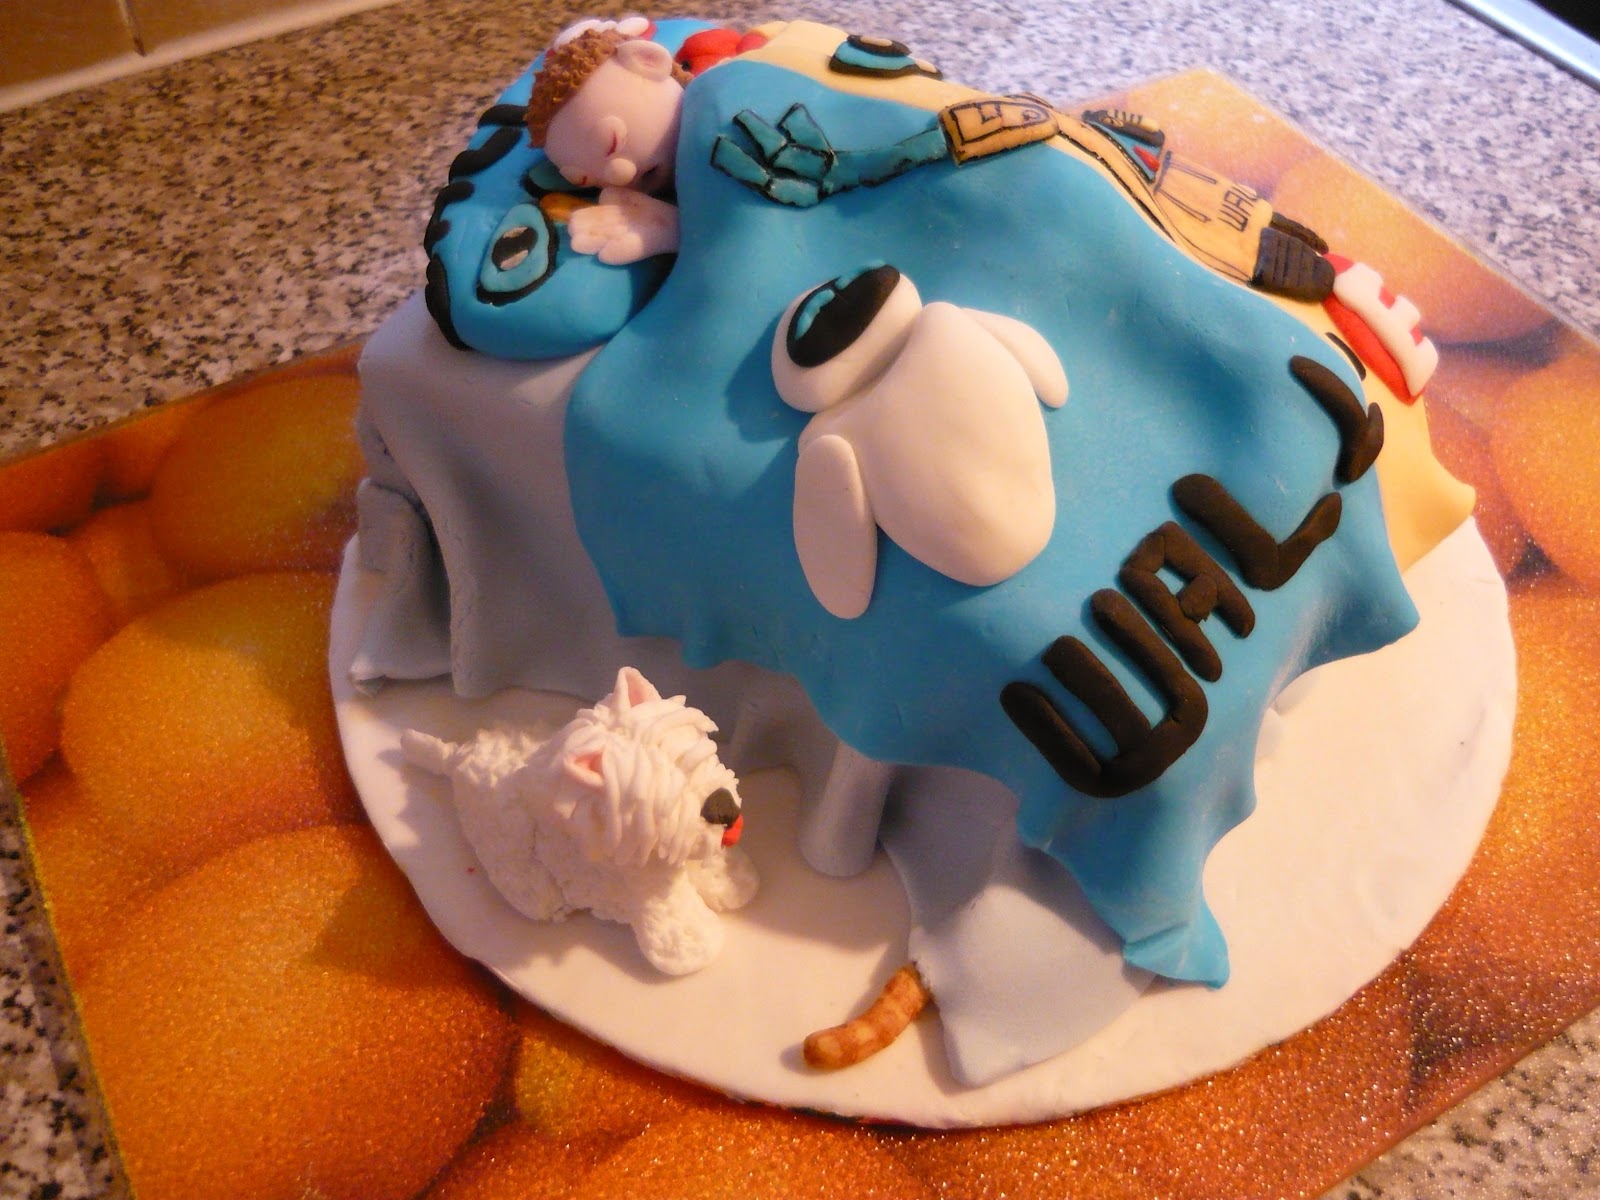
Secondly (other than the small rocks on the Rabbit cake),  I tried marbling fondant with great success.  The Pond was marbled with two different blues, and the Throne of the Frog King was black and white mixed until all the white turned grey so it would look like stone.

Thirdly I wanted the Lilly pads to look wet.  I painted over all three three pads with edible glue which achieved this look with great effect =].

4.5 hrs from start to finish =] =] =].
The marbling effect turned out great.


Frog King with Robe and Crown on an
ancient stone Throne.

Monday

25th April 2011 - Electricians Retirement Cake.

I was asked at work by one of the electricians if I would be able to make a Decorated cake for one of his colleagues who is retiring as of tomorrow.  I had to do a little bit of research for this cake as I don't know what equipment is specialised to electricians. 

I stuck to the basic stuff like wire snips and needle-nose pliers and the likes, as well as some caps, fuses and a gadget I can't remember the name of now but it measures eclectic currents in wires... Electromitor maybe??  He also wanted a little man in his dark blue overalls and hairnet if possible with his toolbox lying nearby.   I think I did everything he asked for and a bit more.

6hrs to make - I'm getting quicker.
A bit of research needed.


1st time using edible metallic dusts.

Saturday

23rd April 2011 - Easter cake and easter cupcakes

I made cupcakes and a disk decorated Victoria Sponge cake today.  The theme was Easter with obvious reasons.... Its Easter =].  I did small chicks, full bunnies, bunnies popping out of and into the ground and Easter baskets filled with different coloured eggs.

The Victoria Sponge Cake was only partially decorated in Fondant because my wife and kids don't really like the taste but still wanted a decorated cake.  I don't know what this type of partially decorated cake is called so I called it a Disk Decorated Cake for reasons you will see when you look at the pictures.

Fun and simple to make.
Only took about 2.5 hrs for All cakes.


Disk Decorated Cake.

Monday

18th April 2011 - Cow cake, rabbit cake and rocky road muffins

This weekend was a bit busier than I thought it was going to be.  I didn't think I had a cake to make for anyone this week so I told Emma from work that I would make her Double Cow Cake this week... She asked me to make it for her about two months ago but she said she was in no rush and to just do it when I got the time.  Well this weekend was that time!!! 

Then when walking the dog on Sunday, Lel asks me if I could make another cake in time for Tuesday because it was Lorna's Birthday.... A bit more time would of been nice and when I got home I was a little stressed with the time I had to do both cakes.  I had already told Emma I would be delivering her cake on monday night and now I had to have a second ready for the latest 5pm on Tuesday.

So I did what any pure blood Englishman does when stressed..... Sat down with a brew (and one of the Rocky Road Muffins my wife made).  After a relaxing brew I got too it.... baking cakes, mixing buttercream, rolling icing and making cake decorations and models.

As I mentioned earlier I did a Double Cow Cake for Emma.  For Lorna I did a Rabbit next to a little pond with ducks, (because its spring), holding a Butterfly.  I also surounded the cake in butterflies because if you haven't guessed already Lorna likes butterflies.

Throughout the cake process my wife cleaned up after me time and again to the point I though I would soon have to pay her a full time wage...... I Love my wife X X X !!!

Rocky Roads made by my wife Lel X X X.
Destress with one of these and a Cuppa Tea mmmmmm.


15hrs in Total for both cakes.
5hrs sleep, all day decorating cake and then nightshift...


Book title "The Big Story".
Vanilla Sponge and Vanilla Buttercream in both
cakes with Stawberry jam.


Both cakes finished by 8:30pm on Monday
Thx Lel for my tea, Cuppa's, snacks and cleaning
up after me for two days X X X.

Wednesday

6th April 2011 - Heart shaped cake with Roses and a Smurf.

Well I got an order from a work mate a few days ago for a pink, girly, heart shaped cake with I Love You on it.   Ohhh and with a blue and white Smurf on it somewhere.  Why a Smurf??? His girlfriend whom the cake was for likes girly things and Smurfs.  I couldn't just slap a smurf on the cake any old how (Heheheh slap a smurf, would its face go red or a different shade of blue/purple???)..............

............... Anyway the cake!!! I decided that the Smurf should be doing something on the cake and the best thing I could come up with so it looked like it was meant to be there, was make it look like it was planting some of the flowers onto the cake straight from plant pots... Well look below and see what you think.... I also took some pictures of what the cake would look like if the Smurf was not part of the cake.

7hrs to make (inc Smurf)
Handmade and painted Roses.


Blue Smurfs and Pink cake don't go!!!

Saturday

19th March 2011 - Adipose 19th birthday -Stargate cake

It was my oldest sons birthday on the 15th and his cake took alot of thought and trials and errors with ideas before I finally put everything together for the result you see below.  He loves Stargate and Pokemon so I incorporated both into the final design.  The person on the cake is meant to represent my son Adamski, wearing the same jeans, shoes and superman T-shirt (logo didn't workout too well!!!), he actually wears now. 

The starfighter on top of the cake is a Death Glider from Stargate.  The Pokemon is Poliwhirl which is one of his favourites.  The red discs with Stargate symbols that  go all the way around the cake are the gate symbols to the lost city of the ancients, Atlantis in the Pegasus Galaxy.  The small figures on the base of the cake are the four team members of SG-1, Teal'c, Sam, Daniel and Jack.  I also placed a mini gate and DHD (Dial Home Device) on the base along with some ancient stones with runes on them.

15hrs Work over several days.
Orange Flavour sponge and Orange buttercream.


Several design ideas later!!!

Friday

4th March 2011 - Tidz 16th Birthday - bed cake

Today is my son's birthday and the cake I made is of him in his bed asleep.  The sleeping position of Tidz in bed is a perfect example of how he sleeps in real life.  I placed a childhood favourite soft toy on his pillow next to him and used the design from the quilt and pillows that he has on his bed today.... All of us men in the household like childish quilt cover designs and that includes me =].  The Westie (our Alfie) and the ginger cat (our Fudge) under the bed, were my wife's idea and I think they add alot to the design of the finished cake.

7.5 hrs work from start to finish.
Victoria sponge cake underneath.


Bed cut to shape when sponge was frozen.
Made over 2 days due to work.


Same Westie from Valentines cake.

Saturday

12th February 2011 - A Valentines cake with Westie

Well its time for St Valentines day again and this year I was determined I was going to make my wife Lel, a cake especially for her.  A heart shaped triple layered orange flavoured sponge cake with an orange buttercream filling and crumb coat, containing real Orange juice and orange zest.

The cake was then covered in marzipan because my perfect wife loves marzipan and I am quite parshall to it myself.... so I wasn't going to complain if that is what she wants.  Once the marzipan was finished and smoothed out i put on the red fondant covering for all love hearts are red!!!

I made tiny roses out of sugarpaste, some of them even had little leaves on them. these are tricky to make to begin with, but after doing a dozen of them I was beginning to get the Knack of it.

Now for the hard part.... A sugarpaste Westie.  Why a Westie you ask?  because if you look down at the first entry to my blog you will see we have a Westie who is now 7 months old.  He is my wife's baby =].  This took a couple of hours of trial, error and alterations to get right but I think I did a good job in the end.... Oh I hope I did because if she doesn't think it looks like a Westie I will get my butt kicked.....

Well now my mini Alfie Westie sugarpaste thingy ma bob is ready, all that's left to do is place a few different sized white sugarpaste hearts over the plain red of the heart cake.  Then arrange and stick down the roses and Alfie..... Job Done and I think it looks good.

Thats one thick chunky cake!!!

Aww lots of sweet things going on =]

Wednesday

9th February 2011 - Lel's Road to Heaven

Lel was off work today and decided she fancied a little baking time for a change.  As I stole the roll of cake maker in the family from her I couldn't say no could I.  So my beautiful wife baked some gorgeous rocky road muffins while I was sleeping.  These are the best muffins I have tasted with a moist sticky sponge.... perfection is all I can say about them.

 
My wifes Rocky Roads are heavenly!!!

Tuesday

8th February 2011 - For friends and Family.

I was asked by some work colleagues to make a cake for then for tonight.  I decided to make a Victoria sponge cake with fresh fruit (strawberries.... because everyone loves those) and double cream filling.
I didn't have all the ingredients to hand so I had to go shopping this morning before I went to bed (I do night shift and had only been in since 6am.) 

Not only did I have to get ingredients for the work cake but also for the one I made for my kids, wife and me.  We had blueberries as well as strawberries though, for that extra tasty twist.  I couldn't use blueberries in the one for work because a lot of people don't like them... Bless 'em =] it's their loss 'cos they taste great.

I forgot to take a photo of the work cake before I wrapped it up.  Just look at the one below but imagine three whole strawberries on the top and no blueberries showing in the filling.


Strawberry Blues Cake

Saturday

5th February 2011 - First time piping.

Well it is time I had a go with a piping bag..... Just simple star shapes but still it is my first try.  The cake I made is chocolate sponge made with a Victoria sponge mix but re-placing 1oz of flour for 1oz of cocoa powder.  The filling was a chocolate buttercream as were the stars I piped on the top.  Unfortunately I didn't make quite enough so I couldn't decorate the whole surface of the cake with rings of stars.

Once I finished the piping, I popped the cake in the fridge to cool the buttercream a little, as it had been warmed by my hands in the bag a little too much.

While that was cooling I tried my hand at actually decorating some butterflies properly for the cake.  I know I did some last week but I didn't spend much time on them.


Stars and Butterflies

29th January 2011 - Kisses and butterflies.

Something simple today because I don't have alot of time on my hands.  I looked in old faithful Be-Ro for easy and quick bakes and found Coffee Kisses and Cupcakes.

The Coffee kisses only took about 20 minutes from start to finish and tasted great.  So great in fact I was told, or should I say demanded to make some more in the future.  I will too and of different flavours like strawberry and cream, Mocha, chocolate and vanilla or such like.
 

Soft Coffee biscuit and Coffee buttercream.... mmmmmmm

 After the Coffee Kisses were done I placed my Victoria sponge mix into paper cupcake cases and popped them in the oven.  After a cuppa and a coffee kiss I took them out and let them cool.  Once cooled ,I spooned some red vanilla buttercream on top along with some decorative coloured sugar crystals.  I thought they still looked a little boring so I spent five minutes cutting out some butterflies from fondant and adding a little colour.  Not great looking but good enough to eat =].

Sparkles and Butterflies.


22nd January 2011 - Checkmate!!!

Today I wanted to bake, coat and decorate a cake.  I had a chessboard theme in mind... not a full chessboard but just one corner in which the Queen and Rook had the King in checkmate.  The base cake was a Victoria Sponge Cake filled and covered in a tasty Lemon Buttercream. I used the flat or bottom of the cake for the top instead of the domed side like normal to give the cake a easier more level platform to work on. 

Once the Lemon Buttercream filling was finished I covered both the top and sides with it too.  This allows for a crumb coating so little bumps don't appear when I cover the cake in Icing.  The Icing went on better than on the Cow Cake which didn't have a crumb coat and shows if you look down my Blog.  This cake had almost no imperfections in the Icing covering which I am pleased about... a more professional look about it.

I then built up the part-chessboard of nine squares using both Sugarpaste and Marzipan.  Each square is two inches by two inches and once I placed and stuck those down I put in the black dividers and border.  After a nice cuppa and something to eat I made to Queen.   She was quite tricky and took several versions before I finally used the one you can see on the cake. 

Next came the Rook or Castle as is sometimes called.  I had to make it blue as this was the main colour of the Queen and the board tiles.  I think looking back I should of spent more time on this but hay-ho job done.  Finally came the King but before that another cuppa and a bit of a think about how to do this.  I decided to go with a tombstone with the King's Crown hanging off the edge.... simple but I liked it.


Checkmate!!!

Death to the King

15th January 2011 - Ginger, Spice and the Cake tastes nice

Me and my wife Lel jointly made some Crusty topped Gingerbread today.  Black treacle really smells awful on its own doesn't it. Anyway the amounts of ingredients vary very differently from recipe to recipe so its more of, choose one and see if the out come is to your liking.  Some of the recipes use half the amounts of some ingredients but more of others which I don't really get but that's life.

The usual cake tests do not apply with Gingerbread neither.  After about 45mins of the 1hr 30mins baking time required, the cake was firm to the touch and crumb/wetness free.  Lel let me do the tests quickly to show me this knowing the outcome.  We pushed it back in the oven to let it bake for the rest of the time needed. 

The end result was a great tasting Gingerbread with a nice crunchy top mmmmmmm yum and perfect.  Lel then got me to make a Lemon Buttercream for the middle of the cake.  Wow I love the taste of Buttercream and it is so easy to make.  The cake is all gone even as I write this.... We so love cake =].
Rough looking but tastes great


8th January 2011 - Me and T-Berry do Weekend cakes.

Christmas is over and 2011 has arrived.  To kick it off me and T-berry make some Chocolate Brownies and Chocolate Angel cakes for the weekend tea.  I thoroughly enjoyed today baking with my young son, especially knowing how tasty his cakes are.

T-Berry mixed all his ingredients together in a slow stirring motion where I tend to use an electric whisk.  This could be the secret to his cakes tasting so good.  I will have to try it that way the next time I make something.

With Valentines coming up soon I will have to do some research into cakes for the season and come up with a design for my wife Lel.  It needs to say I Love You but with something personal in the design...  I will see what I come up with in the next few weeks.


T-Berry does fantastic Brownies =]
Choc Angels - Nice with a Cuppa

Tuesday

28th December 2010 - A Cow for Xmas

The Christmas cake is eaten and tasted great even if I do say so myself.  Sense of pride gleaming in my eyes.

Today my wife Lel asked me to make a Birthday Cake for one of our friends as she did not get one for her birthday which lands on Christmas day.  As I know the person who the cake is for, which makes life a little easier.  I know she likes cows and even takes a cow soft toy with her on holidays.  This cow is placed in the scenic photos she takes. Sweet =].

I had a great time with this cake.  The cake itself is a Victoria Sponge Cake with a Vanilla Buttercream filling.  All of which I made myself.  I kept some of the Buttercream to spread thinly all over the top and sides of the cake.  I then rolled out some bought pink Regalice and placed it over the cake.  After that I made the cow which took me a little while because I kept coming up with little ideas, like the daisies and ladybirds.

After the cow was finally finished (and all the daises and ladybirds were placed), I put him in the middle of the cake.  I then used a garlic press and some green Regalice to make the grass clumps.  After I had finished I look at my first fully homemade cake.  I smiled at the result and felt quite proud of myself =] =] =].


Giant bugs and flowers or a mini cow?

Moooooooooooo !!!
 

Thursday

23rd December 2010 - Xmas Cake Version 2

Today I took the black Regalice I had coloured out of the cupboard to find that the stickiness was not as bad as it have been a few days ago.  I thought about it and gave the penguin I had wanted to do a go (again).   I was pleased with the result and removed the plastic Father Christmas from the cake and re-place him with the Penguin.

It was at this point I looked at the Snowman and the Robin and decided to have ago at those too.  The Snow-Penguin turned out well and is my favourite part of this cake.  The Robin was okay but not great, still good enough to replace the plastic one in the tree though.


Xmas version 2

Saturday

18th December 2010 - Xmas Cake Finished but not how I liked

Today I put the Regalice Icing on the  Christmas Cake.  So far so good.  It was a lot easier to do than I thought.  Getting a smooth finished took a little time, but with it being my first time I don't think I did too bad.

Next came the decorating.  I bought some green Regalice and a pack of white.  I needed yellow and black colours as well but the shop I use doesn't stock a great supply of colours unfortunately.  I was left with having to colour the Regalice myself.  I did the yellow first by adding some yellow food colouring to half the white.  All went well with that and I placed it in a food bag to keep it soft. 

The black however required a lot of food colouring and went very sticky.  I tried adding icing sugar like the Internet said I should but this didn't seem to make much difference.  At this point I decided to put the black to one side and let it dry out a little in the open air while I started on the cake.

To begin with I took the green Regalice and split it into four different sized balls.  I then took each ball and rolled them into cone shapes.  Once done I took my scissors and snipped into the icing trying to make each of the four cones look like Christmas Trees.  It worked in a fashion but still looked better than plastic trees so I ain't complaining.

Next came the Penguin I wanted to do but gave up because the black Regalice I coloured was way too sticky.   I had no option but to use the plastic Xmas cake decorations Lel had gotten for me.  Still the end product didn't turn out to bad =].


Merry Xmas

Tuesday

14th December 2010 - A Marbleous Cake.

After I left work this morning all I wanted to do was bake a cake, any cake..... JUST LET ME MAKE A CAKE =].  But first I needed to sleep after a 12 hour shift.  I didn't know what kind of cake to make and my ingredients cupboard is none too big, so I decided to make the Victoria Sponge Cake again. 

Lel being Lel said I had done that cake already and if I insisted on making it maybe I should do something different with it.  Lel suggested Chocolate filling or a Chocolate topping.  I looked in my cupboards to see what I could find.  Milk Chocolate and White Chocolate and some Cocoa. 

I decided there and then that I would try and make a Marble Cake.  From what I remembered from some recipes (Internet and books), I make a Victoria Sponge mix and pour just half of the mix between the two cake tins.  I then add a heaped spoon of Cocoa powder into the remaining mix and whisk thoroughly until I get a creamy Cocoa Brown colour.

After that is done I pour the Cocoa mix on top of the mix already in the two cake tins.  Then I used the handle end of a knife to slowly draw through the mixtures until I ended up with a swirly pattern through both cake mixes.  After that I popped them in the oven as normal.

Once the cake was fully baked and filled with Jam and Cream, I melted some Milk Chocolate and White Chocolate and swirled it on top of the cake.  Once all the Chocolate was on I used the back of a spoon to make a marble effect in the Chocolate to match the cake.

Tastes great and I remembered to store a piece in the fridge for Odin too =].


Double Cream and Strawberry filling.

Milk and White Chocolate Topping


Saturday

11th December 2010 - Diet Cakes Yes or No?

As its Christmas and everyone always eats way to much I decided to try and bake a diet Cocoa Chocolate Cake recipe I found on a popular food website. 

I was not impressed with the results as the cake did not rise very much at all, (even with my second attempt at the recipe which I substituted the Plain Flour for Self-Raising Flour) and the cake seemed very dry while eating.  It would probably be okay with custard or ice cream but that kind of takes away the point of a diet cake really. 

Hay-ho and all that, this is the first and last time I bake diet style. 

Diet Chocolate Cake - Custard Required!!!
This week I also rolled out the Marzipan and placed it on the Christmas Cake...  I love Christmas =] =] =]


Next week I can put the fondant icing on it and try to decorate my first cake... I better start practicing making models and things with play-dough... its almost the same consistency as fondant.... maybe.... maybe not, but still worth the practice I think.  See next week if it pays off.

Sunday

5th December 2010 - Fruity Success.

My wife Lel showed me how to make a very quick and tasty Banoffee Pie today.....  Lel makes it now and again and it goes down very well with the family. 

To make this Pie Lel Style =]...
Break up 14 Digestive biscuits until you get a cross between powder and small crumbs.

Melt 3oz of Margarine in a pan.  Once melted stir in the biscuit mix and fold until all the biscuit is coated.
         
Place the mix in a 30cm, 2.5cm deep glass serving tray and cover the base evenly. Place in the fridge to cool.

Chop 3 medium bananas approx 0.5cm thick and spread evenly over the biscuit mix.

Open a Tin of Carnation Caramel and spread over bananas.

Pour 250ml of Double Cream into a mixing bowl and whisk until you get soft peaks.

Scrape the cream onto the Caramel and spread evenly, carefully as not to disturb or mix with the caramel.

Grate a fine layer of chocolate over the top aaaaannnnnddddd Jump up and down spin around put it in the fridge and eat when ready.


Banoffee Pie Lel Style


Yum Yum Nom Noms =)

Yay finally got all my ingredients for a Rich Fruit Cake.....  I was a bit nervous about this cake because it seemed a bit advanced for my VERY BASIC ability in cake baking.  I used the Be-Ro recipe because this seemed so much more straight forward than Fiona Cairns book and it can all be done in a lot shorter time frame.  PERFECT.

I didn't put brandy in the mixture while i was making the cake so i am adding two caps of brandy to the top (bottom because i flipped the cake), every day for a week (poured evenly so the sponge does not go soggy)before i cover it with Marzipan next weekend.


I did it YAY... PARTY TIME =].